This page describes how to generate an RSA-2048 key pair on your YubiKey and use it to create encrypted backups in Fordefi.
Download YubiKey Manager and install it.
Download the YubiKey Manager GUI(recommended) and install it or install it at the command line using one of the following methods:
WinGet
winget install Yubico.YubiKeyManagerChocolatey
choco install yubikey-managerAfter installation, open PowerShell or the Windows Command Prompt to use the ykman command.
Check that your YubiKey is correctly detected by running:
ykman listThis should output your YubiKey model and serial number, for example:
YubiKey 5C Nano (5.7.4) [OTP+FIDO+CCID] Serial: 12345678Now, generate a new RSA-2048 key pair in PIV slot 9D (Key Management) and export the public key by running:
ykman piv keys generate --algorithm RSA2048 9d public.pemThis command:
- Creates an RSA-2048 key pair on your YubiKey.
- Stores the private key securely in slot 9D.
- Exports the public key to a local
public.pemfile.
The private key never leaves the YubiKey hardware. Only the public key is exported.
You can verify that the private key is in the correct format and stored at the correct slot in your YubiKey by running the following command (this will not reveal the key):
ykman piv infoOn your local machine, confirm that public.pem was created and is in the correct PEM format:
Linux/macOS:
cat public.pemWindows (PowerShell):
Get-Content public.pemYou should see output starting with:
-----BEGIN PUBLIC KEY-----
...
-----END PUBLIC KEY-----In the side menu, click Settings and then click the Backup tab.
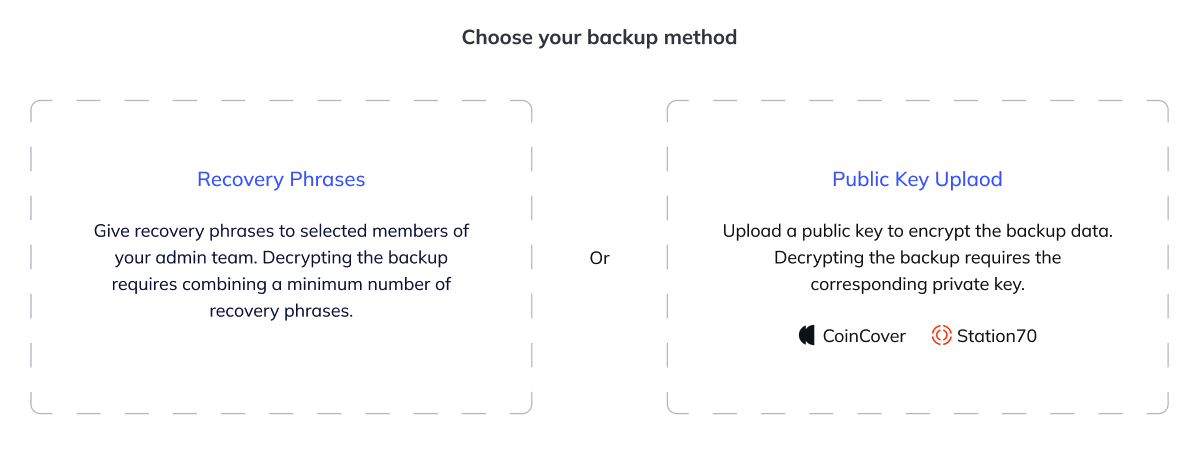
Choose Public Key Upload as your backup method.
In Public key file, choose the public key file. Ensure that it is in PEM format.

Click Next.

Specify an email address to receive encrypted backup snapshots. Click Edit email.
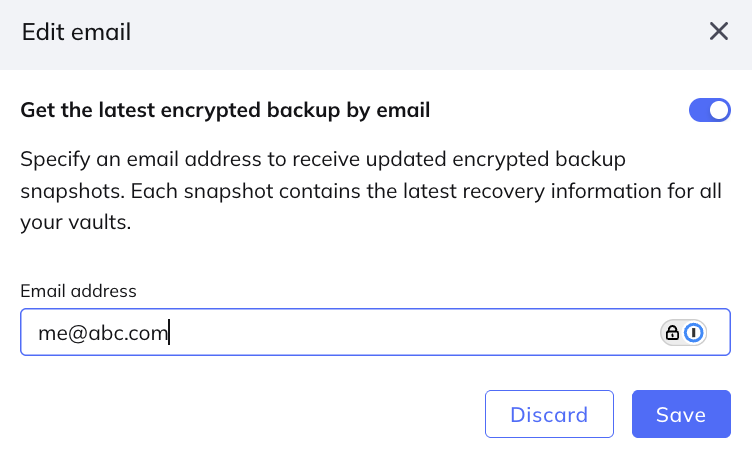
You can choose whether or not the system sends you backup snaphots by email.
- To opt in, toggle on Get the latest encrypted backup by email, then specify the email address of the person who will receive the backup.
- To opt out, toggle off Get the latest encrypted backup by email.
Click Save.
Manually download backupIf you have opted out, no encrypted backups are sent by email. You can still download the latest backup snapshot at any time by selecting Settings > Backup in the Fordefi web console.
Click Initiate backup process.
An updated backup snapshot of the metadata and an encrypted copy of the organization's private keys is sent as a .json file to the backup email address.
Fordefi will send or allow you to download an encrypted backup snapshot as a backup_snapshot.json file. This file contains:
- Vault metadata
- Encrypted copies of the MPC shares (encrypted with your YubiKey’s public key) required to compute your Fordefi account private keys
Only your YubiKey can decrypt these backups, as it holds the matching private key. Keep it safe and store your YubiKey PIN securely offline.