WalletConnect is an open-source protocol and technology that allows users to securely connect their cryptocurrency wallets to DApp websites. It enables a seamless and secure interaction between a user's wallet and a DApp by establishing a direct peer-to-peer connection between them, without the need for intermediaries or browser extensions.
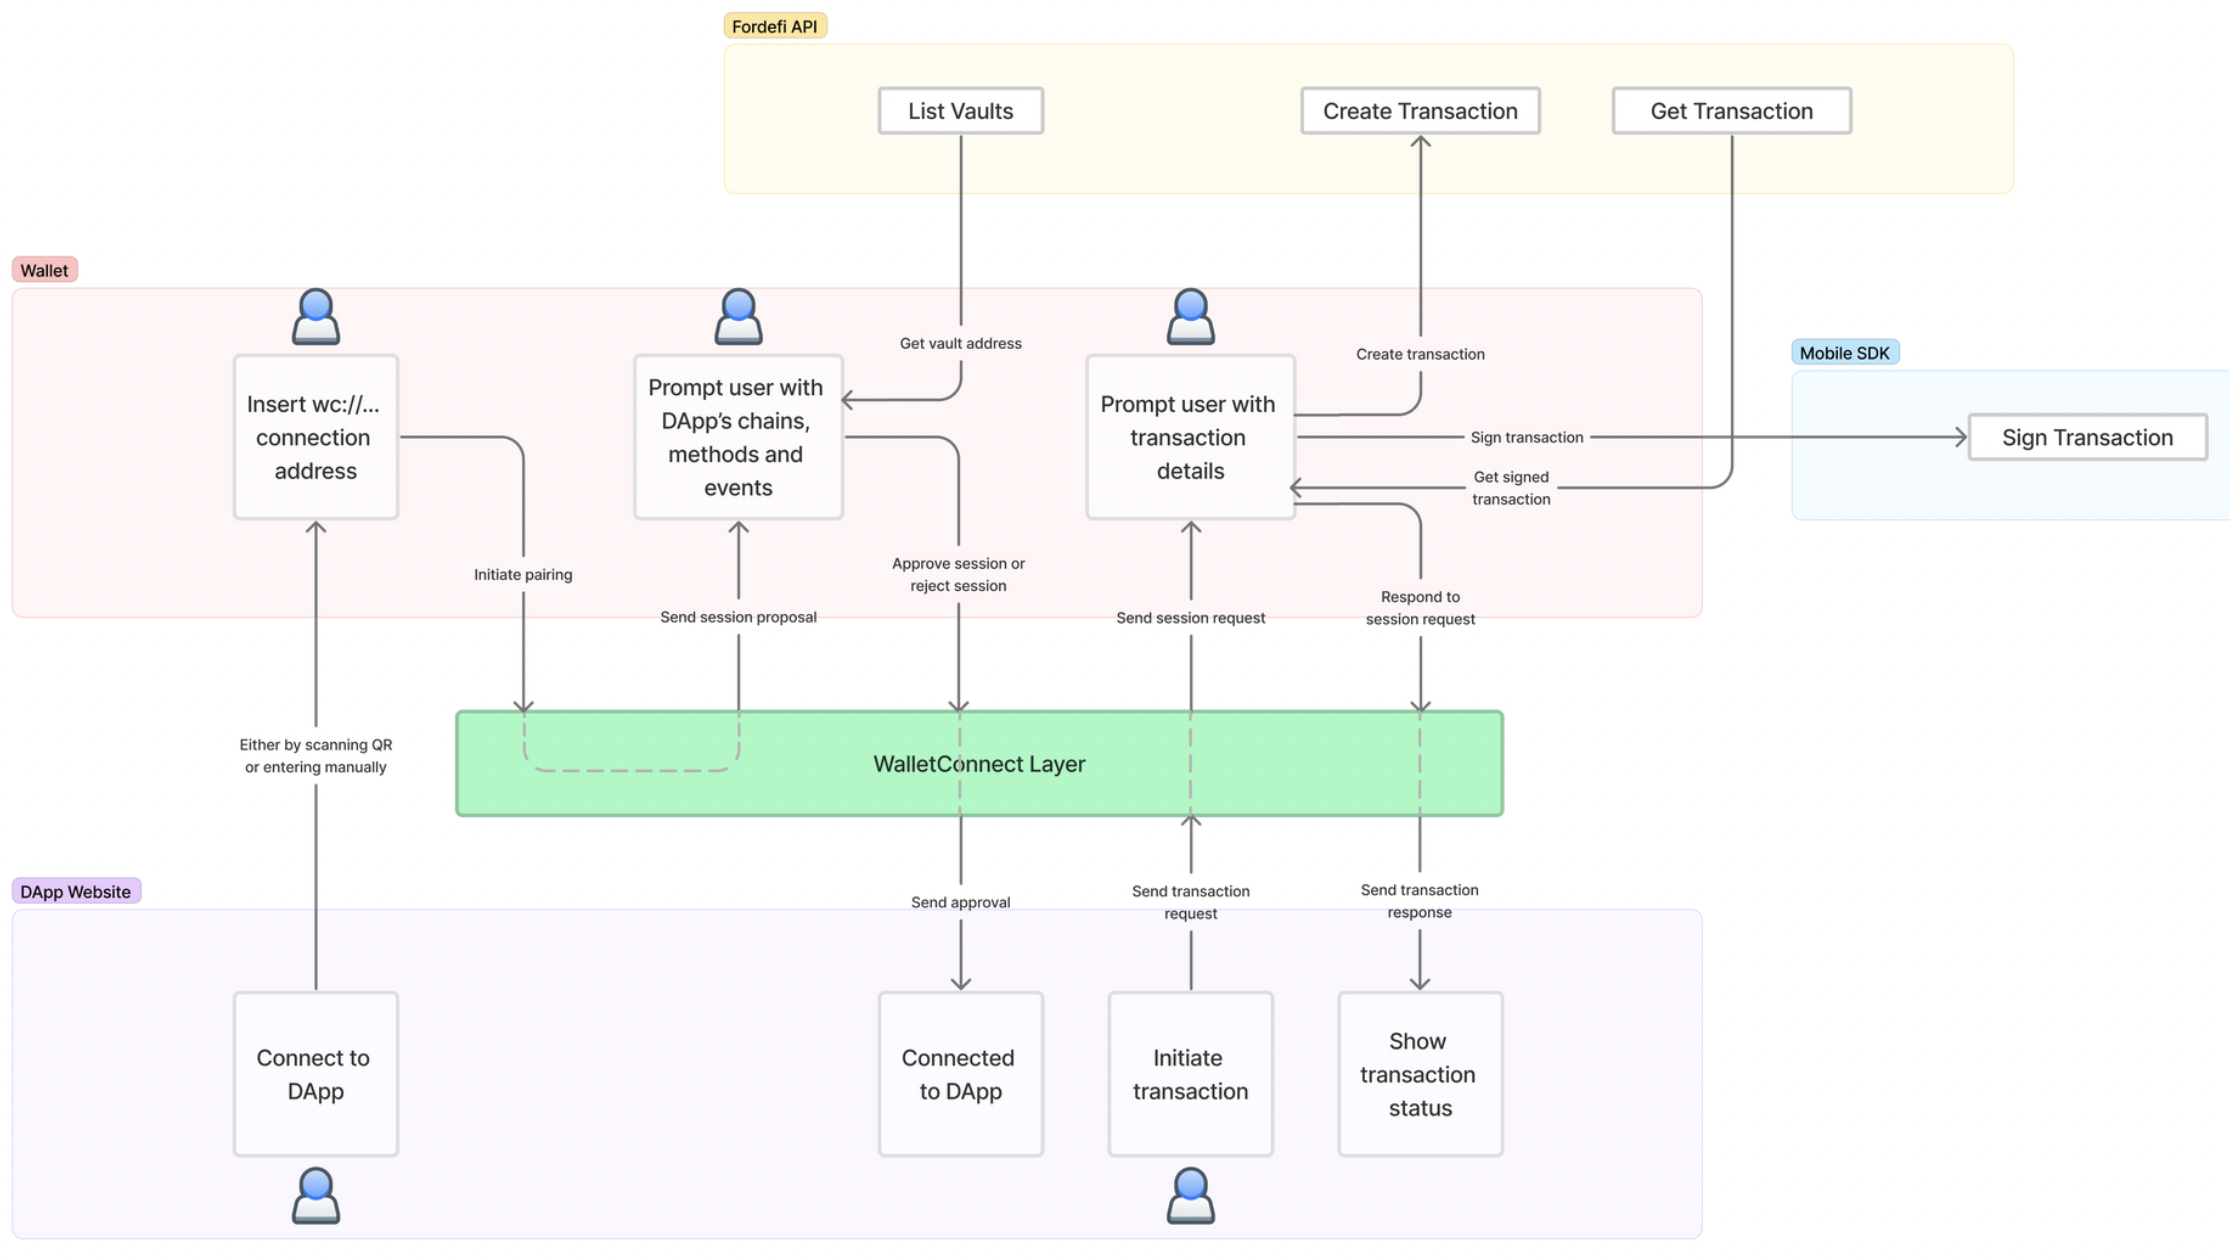
Fordefi's API and Mobile SDK allow customers to bridge the interaction between the WalletConnect API and the DApp website, facilitating WalletConnect's interaction with assets and blockchain operations.
Get started
Make sure you have a WalletConnect Cloud account.
- Navigate to https://cloud.walletconnect.com/app.
- Select your app.
- Copy the app’s project ID. It will be needed by the WalletConnect library.
Install the relevant packages, as described here.
Clone WalletConnect’s example app, which will be referenced in many places in this page.
Initialize
Start by initializing Web3Wallet, which is the WalletConnect component that enables communication with the DApp.
core = new Core({
  // @notice: If you want the debugger / logs
  // logger: 'debug',
  projectId: ENV_PROJECT_ID,
  relayUrl: ENV_RELAY_URL,
});
As seen in the example here, the Core object receives the ENV_PROJECT_ID, which is the project ID you copied in the previous section, and ENV_RELAY_URL, which is wss://relay.walletconnect.com.
web3wallet = await Web3Wallet.init({
  core,
  metadata: {
    name: 'React Native Web3Wallet',
    description: 'ReactNative Web3Wallet',
    url: 'https://walletconnect.com/',
    icons: ['https://avatars.githubusercontent.com/u/37784886'],
    redirect: {
      native: 'w3wrnsample://',
    },
  },
});
Next, call Web3Wallet.init with the Core that you defined and the metadata of your wallet app.
Now you have a web3wallet object, which you will use for communicating with the DApp.
Wallet flow
Connect to DApp flow
The WalletConnect flow starts with the customer accessing a DApp and selecting to connect through WalletConnect. Once the QR code is shown, the wallet app either allows scanning the QR or manually copy the wc://a13aef… URL to the wallet.
function _pair(params: {uri: string}) {
  return await core.pairing.pair({uri: params.uri});
}
Once the URL is acquired, the wallet passes the URL to WalletConnect’s core.pairing.pair which initiates the pairing process. You can find it in the demo here.
This will initialize the pairing flow which will result in a session proposal event, which is received through a listener on the web3Wallet, like so:
web3wallet.on('session_proposal', onSessionProposal);
You can find it in the demo here.
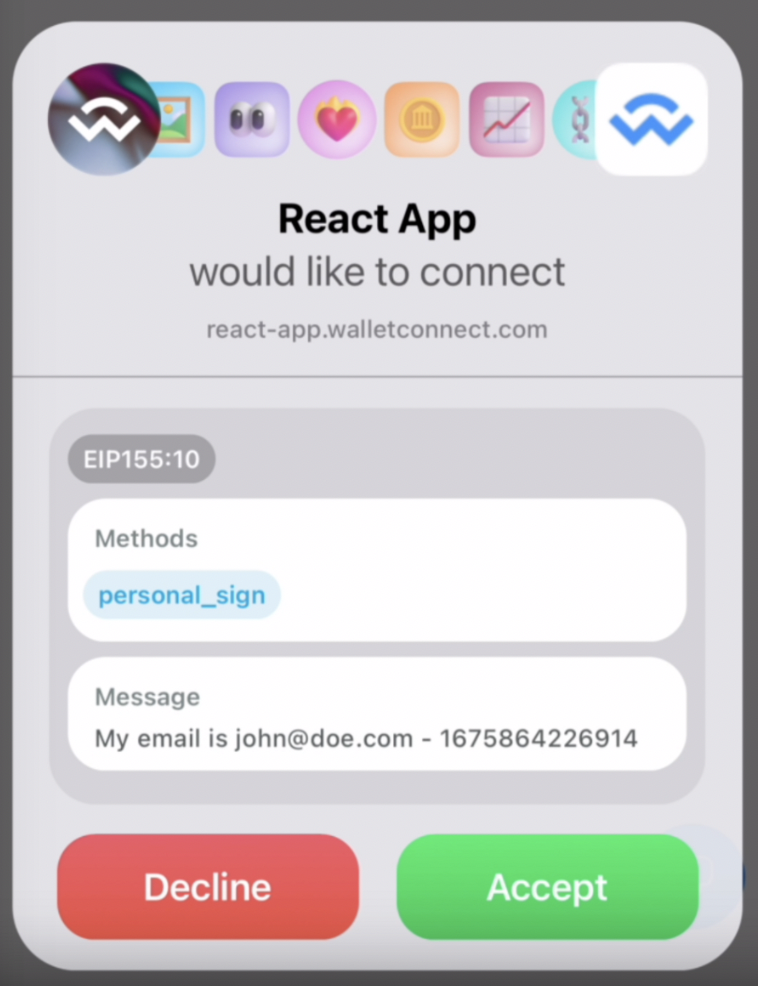
The pairing proposal consists of requiredNamespaces and optionalNamespaces.
Each holds the requested chains, methods, and events needed to be approved for usage of the DApp.
Note
DApps usually pass their available methods and chains in the
optionalNamespacesobject, so we suggest you allow them as well.
First, the user is prompted to accept the pairing, as seen in the demo here.

Once you accept the prompt, the wallet must call web3Wallet.approveSession with the approved methods, events, and the vault address. You can see how it’s done here.
To get the end user’s vault information, call Fordefi's List Vaults API endpoint and pass user’s ID to the key_holder_ids filter.
Send transaction flow
Once you create a new transaction in the DApp, it will trigger an event which is received through a listener on the web3Wallet, like so:
web3wallet.on('session_request', onSessionRequest);
You can find it in the demo here.
The request holds the method, which is the transaction type, as shown here:
switch (request.method) {
  case EIP155_SIGNING_METHODS.ETH_SIGN:
  case EIP155_SIGNING_METHODS.PERSONAL_SIGN:
    handleSignPersonalMessage(...);
    return;

  case EIP155_SIGNING_METHODS.ETH_SIGN_TYPED_DATA:
  case EIP155_SIGNING_METHODS.ETH_SIGN_TYPED_DATA_V3:
  case EIP155_SIGNING_METHODS.ETH_SIGN_TYPED_DATA_V4:
    handleSignTypedDataMessage(...);
    return;
  case EIP155_SIGNING_METHODS.ETH_SEND_TRANSACTION:
  case EIP155_SIGNING_METHODS.ETH_SIGN_TRANSACTION:
    handleSignTransaction(...);
    return;
}
The user is prompted with the transaction details, as seen in the demo here.
Once the user accepts the prompt, the wallet sends the transaction to the blockchain and then returns the transaction’s hash back to WalletConnect.
Create transaction
After extracting the transaction information from the request, call Fordefi's Create Transaction API endpoint, which returns the newly created transaction ID.
Sign transaction
To get the transaction signed, call Fordefi's signTransaction SDK method, pass the transaction ID, and wait for it to complete.
Get message signature
If the request is to sign a message or a transaction, the last step is to call Fordefi's Get Transaction API endpoint with the transaction ID and receive the signed transaction along with the signature inside the signatures[0].data field. Keep in mind that it’s passed in base64 while WalletConnect requires it to be in hex format, so it needs to be converted to hex.
Get transaction hash
If the request is eth_sendTransaction, the last step is to call Get Transaction API endpoint with the transaction ID and receive the signed transaction along with the hash field.
Send hash to WalletConnect
Return the hash back to WalletConnect as a JSON RPC using web3wallet.respondSessionRequest. An example can be found here.